
Posted January 3, 2016
Installation Instructions
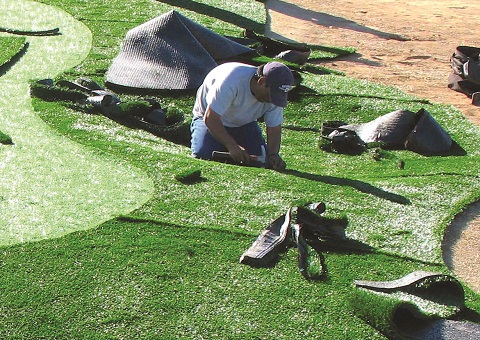
Area MeasurementsWe recommend sketching out your area and taking good measurements. Take measurements based on product being directional. You can also bring your drawing in or email it to us and we can advise the material required to complete the install. Waste factor on most projects is around 20%, putting greens around 25%. Setting Grade & PrepTo begin the project the area needs to be 2 ½” below grade, and free of any existing root base. When an existing lawn is present (even if dead or dormant) it is strongly recommended to remove at least 2 ½” of the existing grass. A sod cutter works best for large areas and can normally be rented from your local hardware or rental equipment store. In addition you can use a vegetation killer if you want more protection, but it is not required. Spreading aggregate to create sub base-Spreading aggregate over the installation area is the first step in creating your sub base for synthetic grass. It is recommended the base be at least 2” deep. Use an asphalt or landscape rake to spread aggregate evenly and level your base. Dampen the entire area. Compact the area using a hand tamper or plate compactor. When complete, the sub base should be a hard, smooth surface for the turf to lie over. The sub base gives the turf a solid foundation while providing proper drainage. Common sub base materials are ¼ minus, or decomposed granite. Approximately 1 ton per 100 square feet is average. If your area is low more base maybe required. Roll commercial weed fabric into place-It is recommended to use a commercial grade weed fabric to keep unwanted weeds or grass from growing up into your artificial grass. Roll the weed fabric over your sub base and secured with a few nails to keep the fabric from moving while you are rolling the artificial grass into place. Overlap the fabric by a couple of inches. Trim excess manufacturing material from turf- When turf is manufactured, an extra couple of inches of backing material remains along the edge of the turf. This extension runs the length of the turf roll on both sides after the last stitching row of yarn. Before you can seam two pieces of turf together you must remove the extra material. To trim the excess material, flip the turf over and work from the backside. Find the second row of stitching and start cutting between the second and third stitch row with a carpet knife. When your knife becomes dull, replace or rotate the blades to keep your cuts neat. – Do not cut turf from the top as it will sever the grass blades. Rolling out turf to prepare for installation on the base-After you have measured and marked your sections, roll the turf over the base and cut each section. It is a good idea to leave a little extra length while you position the turf. You will trim off the extra length once you have all the turf in position and are ready to cut the final shape. You will want to make sure that you roll out the turf in the same direction each time, as artificial grass is grain directional. Cutting turf around rocks and other odd-shapes- Start from the center of the rock and make small slits around it. You want to keep the turf right up to the rock edge and get the turf to lay flat on the ground without wrinkles. Make as many small cuts as necessary to achieve this. Remove any excess turf and work with smaller pieces. It is much easier to maneuver without large pieces or turf flapping down hindering your movement. Using nails to secure turf edges- Use nails to secure the turf edges and around the perimeter of the installation area. It is important to use nails that are 3” - 6” in length to properly secure the grass to your base. We recommend electro galvanized or steal nails, as you want the nails to rust, allowing them to expand and hold the turf more securely into the sub base. Simply tap in nails along the perimeter every 3” - 4”. It is also recommended that nails be used about every 3’ within the interior area – picture a 3’ grid. If your install project will receive very high foot/paw traffic or if you notice the turf feels loose or wrinkles additional nails can be used. Seaming two turf sections together-Before cutting the turf to make your seams, always make sure the grain of the fibers are facing the same direction on both sections of turf. Check and double-check the fit of the two sections making sure there is no overlap. Any overlapping of the two pieces will cause a bulge or wrinkle in the seam. Alternate nails down the seam in a zigzag formation every 1” - 2” along the entire seam. Broom the fibers up before using the drop spreader to spread the infill. Using a drop spreader for sand infill-The drop spreader is used to evenly disperse sand infill into the turf fibers. Approximately 1.5 – 2.0 lbs per square feet of silica sand is recommended for standard installations. Fill your drop spreader with sand and start at one corner of your lawn just like spreading fertilizer on natural grass. Walk behind the spreader at a steady pace dropping a measured amount around the perimeter a couple of times. You can either continue walking in a circle until you reach the middle or start spreading using up and down passes. The key is to spread the sand as evenly as possible. Depending on the turf you purchased a small amount of crumb rubber may be recommended, discuss this with our turf experts. Finish the infill process with a final brooming-Brooming can be done with a stiff bristled brush/broom or a power broom. Start from one end making smooth strokes against the grain over the entire area. Look closely at all areas, if necessary add sand with a dropspreader where it is needed and work those areas in with your broom. Putting Greens/Cups- Install cups in the base material. Do this by digging holes that are 2 inches wider and 6 inches deeper than the cup. Set a cup in the middle of each hole and pour quick-drying concrete around them. Be sure to leave at least 1 inch of the cup left exposed. Wait until the concrete is dry and cover the cups with more base material. Lay the turf roll. Start at the edge of green and continue to roll over the entire green, making sure to smooth out all the creases. Find the spots where you installed the cups. Take the utility knife and cut around the inside of the cup to remove the turf in these areas. Be sure to trim the edges and use finishing nails to hold the turf in place.
 BACK TO ALL ARTICLES

